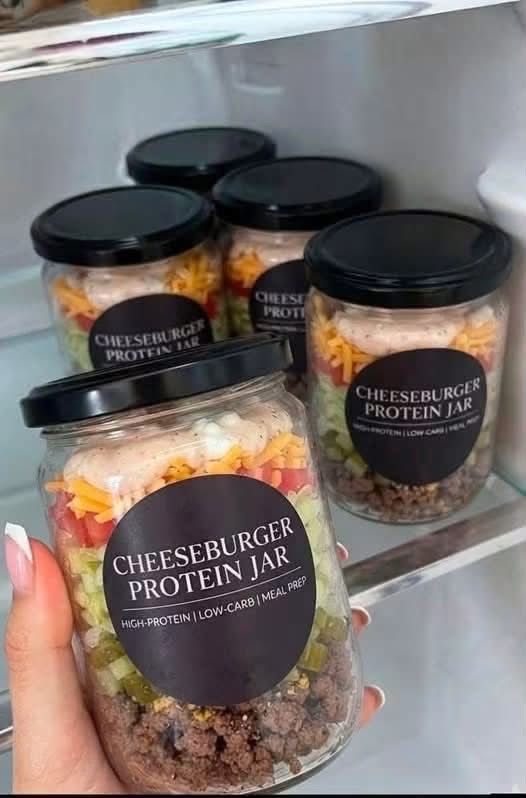
If you crave the savory, indulgent taste of a drive-thru cheeseburger complete with tangy special sauce, but want to keep your macros on point, these Cheeseburger Protein Jars are an absolute game-changer.
Layered with seasoned lean ground beef, tangy dill pickles, crisp lettuce, fresh tomatoes, shredded cheddar, and a creamy light burger sauce, this meal-prep hack gives you all the iconic flavors of a loaded burger in a convenient, low-carb, high-protein glass jar.
Why You’ll Love This Meal-Prep Hack
Drive-Thru Flavor, Better Macros: Satisfies fast-food burger cravings while keeping calories low and protein high.
Ultimate On-the-Go Meal: Perfectly portioned in glass mason jars so you can grab one and head out the door.
Stays Crisp & Fresh: Layering wet ingredients away from the lettuce keeps the salad crunchy for days.
Essential Kitchen Equipment
16 oz Wide-Mouth Glass Jars: Wide rims make layering and eating straight from the jar effortless.
Large Skillet: For browning and seasoning the ground beef or turkey.
Small Mixing Bowl: To whisk up the healthy homemade special burger sauce.
Ingredients
For the Healthy Burger Sauce:
1/2 cup Light mayonnaise or plain non-fat Greek yogurt
2 tbsp Sugar-free ketchup
1 tbsp Yellow mustard
1 tbsp Dill pickle relish
1/2 tsp Garlic powder
1/2 tsp Onion powder
1/2 tsp Smoked paprika
For the Cheeseburger Layers (Makes 4 Jars):
1 lb (450g) 93% lean ground beef (or ground turkey/chicken)
1 tbsp Burger seasoning (or a mix of salt, pepper, garlic powder, and onion powder)
1/2 cup Dill pickles, finely diced
2 cups Shredded iceberg or romaine lettuce
1 cup Roma tomatoes, seeded and finely diced
1/2 cup Reduced-fat sharp cheddar cheese, shredded
Step-by-Step Instructions
Step 1: Cook & Season the Meat
1. Heat a large skillet over medium-high heat. Add the lean ground beef and cook for 6 to 8 minutes, breaking it into small crumbles until fully browned.
2. Drain any excess grease, stir in your burger seasoning, and remove from heat. Let the meat cool completely before assembling to avoid wilting the fresh veggies.
Step 2: Mix the Burger Sauce
1. In a small bowl, whisk together the light mayo (or Greek yogurt), sugar-free ketchup, yellow mustard, pickle relish, garlic powder, onion powder, and smoked paprika until smooth.
Step 3: Layer the Jars
1. Layer 1 (Bottom): Divide the cooled, seasoned ground beef evenly among the bottom of 4 glass jars.
2. Layer 2: Add a layer of diced dill pickles over the meat.
3. Layer 3: Add the crisp shredded lettuce and diced tomatoes.
4. Layer 4: Top with a sprinkle of shredded cheddar cheese.
5. Layer 5 (Top): Spoon a dollop of the healthy burger sauce right on top.
Step 4: Seal & Refrigerate
1. Screw the lids on tightly and store in the fridge until ready to eat!
Chef’s Tips & Smart Tricks
Cool the Meat First: Never layer warm meat directly beneath fresh lettuce and veggies in a meal-prep jar, or the heat will trap steam and make the greens soggy.
Shake or Dump: When ready to eat, you can either shake the jar vigorously to mix the sauce and ingredients together, or dump the contents out into a bowl for a giant cheeseburger salad.
Add Bacon Crumbles: For a “Bacon Cheeseburger” twist, add 1 tablespoon of real center-cut bacon bits into each jar!
Nutritional Breakdown (Per Jar)
Servings: 4 jars
Calories: ~310 kcal
Protein: 32g
Net Carbs: 6g
Fat: 15g
Frequently Asked Questions (FAQ)
How long do these cheeseburger jars stay fresh in the fridge?
Stored sealed in the refrigerator, these jars remain crisp, fresh, and delicious for up to 4 days.
Can I heat up the jar?
If you prefer warm ground beef, pack the sauce, lettuce, tomato, and cheese in a separate top compartment or jar. Heat the beef in the microwave first, then toss in the cool veggies and sauce right before eating!