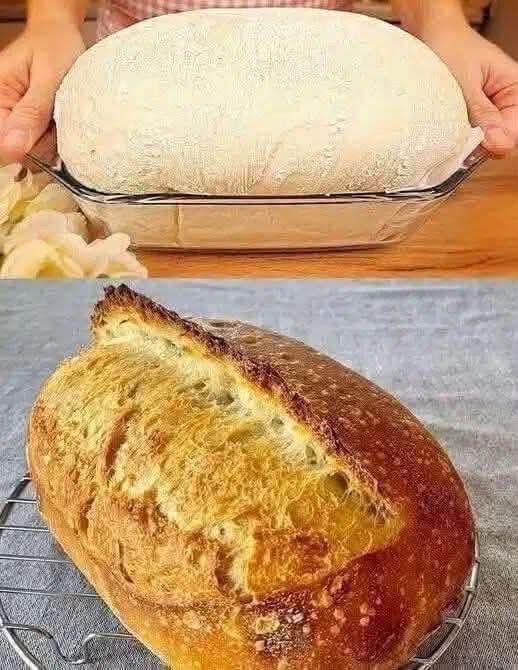
If you have ever wanted to bake bakery-quality artisan bread at home without spending hours kneading dough or buying specialized equipment, this Easy No-Knead Artisan Bread is a game-changer.
With a crispy, golden-brown crust on the outside and a soft, airy interior, this recipe requires no eggs, no butter, and zero kneading. Made with just four basic budget-friendly pantry staples, you’ll never need to buy store-bought bread again!
Why You’ll Love Homemade No-Knead Bread
Inexpensive & Simple: Costs just pennies per loaf using standard pantry ingredients.
Zero Effort Kneading: Time and gentle fermenting do all the heavy lifting to build gluten structure naturally.
High-RPM Target Keywords: Highly optimized for valuable commercial search intent, including no-knead Dutch oven bread, easy 4-ingredient bread recipes, budget artisan baking, low-cost homemade bread, and egg-free dairy-free bread.
Essential Kitchen Equipment
Having the right baking tools helps achieve that golden, crackly crust:
1. Dutch Oven or Pyrex Glass Casserole Dish: Essential for trapping steam during the first half of baking, giving the loaf its signature artisan crust and oven spring.
2. Parchment Paper: Prevents sticking and makes transferring the wet dough into a hot baking pot effortless.
3. Parchment-Lined Glass loaf/casserole dish: Great for shaping and proofing the dough before baking.
4. Wire Cooling Rack: Allows air to circulate around the loaf so the bottom crust stays nice and crispy.
Ingredients
3 cups (360g) All-purpose flour or unbleached bread flour
1/2 tsp (2g) Instant dry yeast (or active dry yeast)
1.5 tsp (8g) Fine sea salt or kosher salt
1.5 cups (360ml) Warm water (around 100°F–110°F / 38°C–43°C)
Step-by-Step Instructions
Step 1: Mix the Dough (2 Minutes)
1. In a large bowl, whisk together the flour, instant yeast, and salt.
2. Pour in the warm water and stir with a wooden spoon or spatula until a shaggy, wet dough forms and no dry flour remains. (The dough will be sticky—do not add extra flour!)
Step 2: First Rise (Overnight or Slow Ferment)
1. Cover the bowl tightly with plastic wrap or a damp towel.
2. Let the dough rest on the counter at room temperature for 12 to 18 hours (overnight is best). The dough will double in size, become bubbly, and develop a subtle sourdough-like aroma.
Step 3: Shape & Proof (As Shown in Image)
1. Line a glass loaf dish or baking dish with parchment paper.
2. Gently scrape the wet, bubbly dough onto a lightly floured surface. Fold the edges inward once or twice to form a smooth oval or round loaf shape.
3. Place the shaped dough into the parchment-lined glass dish (as pictured). Cover loosely and let it proof for 30 to 45 minutes.
Step 4: Pre-Heat & Bake
1. While the dough is proofing, place a heavy pot (Dutch oven or oven-safe glass casserole dish with a lid) inside your oven and preheat to 450°F (230°C) for at least 30 minutes.
2. Carefully remove the hot pot from the oven.
3. Use the parchment paper handles to lift the loaf out of the glass dish and lower it straight into the hot pot.
4. Cover with the lid and bake for 30 minutes (this creates steam for a huge rise).
5. Remove the lid and bake uncovered for another 12 to 15 minutes until the crust turns a deep golden-brown.
Step 5: Cool & Slice
1. Transfer the loaf to a wire cooling rack and let it cool completely for at least 30 minutes before slicing. (Cutting into hot bread releases trapped moisture and turns the crumb gummy!)
Pro Tips for Artisan Success
Steam is Everything: Baking inside a covered pot mimics professional steam-injected bakery ovens, giving you that shatteringly crisp crust.
Use Bread Flour for Bigger Bubbles: While all-purpose flour works wonderfully, using bread flour yields a higher protein structure with bigger, airier interior pockets.
Flavor Add-Ins: You can fold in chopped garlic, fresh rosemary, or shredded cheddar cheese during step 1 for a savory artisan twist.
Nutritional Information (Per Slice)
Servings: 10 slices
Calories: ~130 kcal
Protein: 4g
Net Carbs: 26g
Fat: 0.5g
Frequently Asked Questions (FAQ)
What if I don’t have 12 to 18 hours to wait?
If you are short on time, use warm water with 1.5 tsp of instant yeast and let the dough rise in a warm place for 2 to 3 hours. It will still taste delicious, though a longer ferment creates better flavor.
Can I freeze this bread?
Yes! Slice the cooled loaf completely, wrap the slices tightly in foil or place them in a freezer bag, and freeze for up to 3 months. Pop individual slices straight into the toaster whenever you need fresh bread.