These rustic, gluten-free bread rolls are dense, nutritious, and incredibly simple to make. Because they rely on the natural binding power of chia seeds and moisture-absorbing oat flour, there is absolutely no yeast, kneading, or rising time required. They bake into perfect, crusty little buns that are ideal for healthy sandwiches or a morning toast.
Ingredients
2 cups of oat flour (blended rolled oats work perfectly)
1 tablespoon of chia seeds
1 cup of water
1 teaspoon of salt
Olive oil (just a splash for coating your hands when shaping)
Instructions
1. Combine the Dry Ingredients
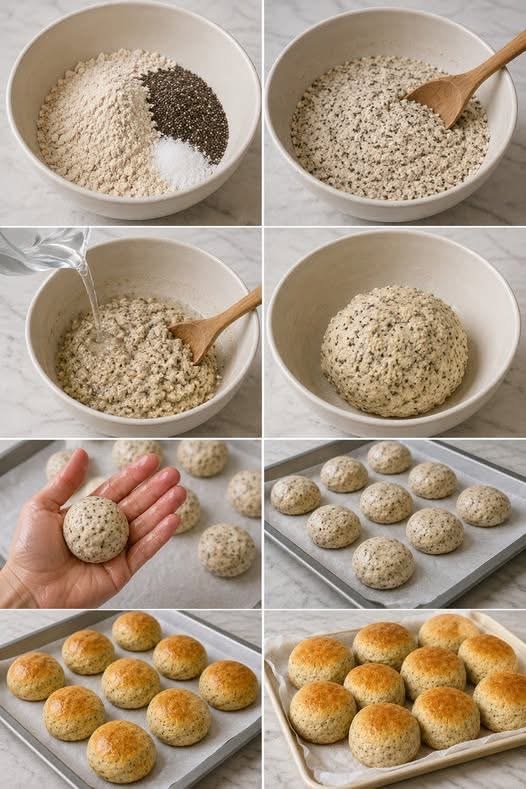
In a large ceramic mixing bowl, add the 2 cups of oat flour, 1 tablespoon of chia seeds, and 1 teaspoon of salt (as shown in the top-left panel of the image). Use a wooden spoon to thoroughly mix them together until the chia seeds and salt are evenly distributed throughout the flour.
2. Hydrate the Dough
Slowly stream the 1 cup of water into the center of your dry mixture (illustrated in the second-row left panel). Stir continuously with your wooden spoon. The mixture will initially look wet, but keep stirring—the oat flour and chia seeds will rapidly absorb the water.
3. Let it Bind and Rest
Gather the mixture into a single, cohesive dough ball at the bottom of the bowl (shown in the second-row right panel). Let the dough sit undisturbed for 5 to 10 minutes. This brief rest is crucial because it allows the chia seeds to gel and the oats to fully hydrate, turning a sticky mass into a beautifully pliable, smooth dough.
4. Shape the Rolls with Oiled Hands
Preheat your oven to 375°F (190°C) and line a large baking sheet with parchment paper.
Pour a small splash of olive oil onto your palms and rub your hands together.
Divide the dough into 9 to 12 equal portions. Roll each piece firmly between your oiled palms to form a perfectly smooth, round ball, exactly as styled in the third-row left panel. Place them in neat rows on your prepared baking sheet.
5. Bake Until Deeply Golden
Pop the baking sheet into the oven and bake for 25 to 30 minutes. The rolls are ready when they have puffed up slightly, feel firm to the touch, and have developed a beautiful, rustic golden-brown crust across the tops (pictured in the bottom panels).
6. Cool and Slice
Remove the rolls from the oven and let them cool on a wire rack for at least 15 minutes. This allows the dense crumb structure inside to set perfectly so they slice cleanly without being gummy.